


Hello Wildwood sewists! Are you ready to complete your dresses? This dress may take longer than most of the patterns I make, however, once you get the hang of all the little details in this design, it will go much more quickly if you choose to sew it again sometime.
I am going a little out of order from the written instructions today. I want to start with the belt because.... my thinking is that when you get to the point where you attach the bodice to the skirt, if you have the belt finished, you can sort of try on the dress with the belt to see if the fit and the length are good. That way, you can make adjustments before you attach the final hem facings. It's not the end of the world if you have to take the facings out or don't want to use them at all and just fold the bottom hem up and stitch the usual way but the hem facings do make for a really nice, wide and substantial finish.
16.
So... first fuse your Belt Interfacing (piece #14) to the wrong side of one of the Front Belt pieces (#11).

Interfacing fused to wrong side of Front Belt. I just fuse interfacing to one Front Belt piece with linen but if you are using a flimsier fabric such as rayon challis, you may want to interface both pieces.
With the unfused Front Belt piece (or one of the pieces if you've fused both), turn back one short end 5/8"/16mm towards the wrong side and press.

5/8"/16mm turn back of one end of the Front Belt towards the wrong side.
Next, with wrong sides together and using a 3/8"/10mm seam allowance, stitch the Belt Ties (pieces #12) together- down one side, pivot at the corner angled end and pivot again and back up the other side leaving the short, flat end open.

Stitching the Belt Ties together.

Belt Ties stitched together and flat ends open.
Trim the end and corners of the Belt Ties.

Trimmed ends and corners of one of the Belt Ties.
Now it's time to reverse the Belt Ties. I like to find something like a knitting needle or in this case, my tube turner. I first pull apart the fabric at the sides of the Belt Tie end as seen below.

Pulling at the sides of the Belt Tie ends to make a space to insert the tube turner or knitting needle (flat end).
Next, insert the tube turner or knitting needle (flat end not pointed end) into the pouch you created and push - as seen below.

Continue pushing and reversing the Belt Ties until you have pushed all of it through.

Now you can take the tube turner/knitting needle out and reverse the rest by hand. You can also do the entire thing by hand, without a tube turner but this is easier if you have one of these items.

Then press your Belt Ties once they are completely turned out to the right side. Now attach one at each end (right sides together) of the interfaced Front Belt piece using a 5/8"/16mm seam allowance.

Belt Ties attached to right side of the interfaced Front Belt piece.
Before you attach the other Front Belt piece to this one, you might fold the Belt Ties up together and possibly pin them together to keep them out of the way of the seams. If your Belt Ties are long enough, let one hang out of it's opposite end, the one that will remain open for turning your belt right side out. The tie can help you reverse the belt by grabbing onto it and pulling.

One Belt Tie sticking out of the open end.
Now, with right sides together, pin the other free Front Belt piece to the one with the ties attached to it. The end with the 5/8"/16mm folded back end will be set back 5/8"/16mm from the end that will be open for turning your belt right side out.

Front Belt pieces together and 5/8"/16mm turned back end is off-set at the open end.
With a 3/8"/10mm seam allowance, stitch all the way around the Front Belt - leaving the one end open for reversing the belt.

Belt stitched together with one end opened for reversing. Note that the Belt Ties on the larger sizes may not be long enough to stick out of the open end to aid with reversing.
Now pull the Belt Tie that is sticking out of the open end (if you can) and reverse your belt. Press well.

After pressing and tucking the raw edges of the belt opening inside, stitch the opening closed either with a machine stitch close to the folded edge like below or with a hidden stitch using a hand sewing needle and thread.

SKIRT
We are now ready to start the skirt portion of the dress!
7.
First mark the dart tips on the inside of the Back Skirt waist (piece #5).
With right sides together, fold the skirt so that the dart legs at the waist are matched up together. Pin in place and then stitch from the dart legs to the tip. Don't backstitch at the tip and leave the thread tails long. Hand tie knots in the thread ends - about 4 times to be safe.

Stitched Back Skirt waist dart. Hand knotting the threads at the dart tip.
Tip - For pressing darts, it is best to use a tailor's ham if you have one. This keeps the shape of the garment created by the dart. If you press the dart flat, you might shrink up the fabric and take out some of the very shape you just created.

A tailor's ham for pressing darts.
O.K. so here's another case of do as I say, not as I do. I don't know what was wrong with me the day I sewed this dress but I was not on my A game. I pressed the darts towards the side seams instead of the center like you are supposed to do as you can sort of see below in the attempt to demonstrate pressing with a ham.


Press the darts towards the center of the Back Skirt.

Darts pressed towards the center back.
I find it very helpful to label the skirt and hem facings as they are easy to turn upside down and get mixed up being that the left and right skirt fronts and facings are different. Below you can see that I used simple scotch tape and a pen. I also labeled the direction or top of the hem facings so they are easy to orient correctly.

Labeled pieces.
8.
Using your iron, fuse the Pocket Interfacing (piece #15) to the wrong side of the Pocket Bag (piece #6). Set the interfacing strip between the pocket opening notches on the angled edge and about 1/8"/3mm - 1/4"/6mm away from the edge. This will help reinforce the pocket opening so it doesn't stretch out so much when putting your hands in the pockets.

Pocket Interfacing fused to the inside of the Pocket Bag edge.
Next, with right sides together, attach the Pocket Bag to the Left Skirt Front (piece #4) using a 3/8"/10mm seam allowance. Now repeat with the Right Front Skirt (piece #3).

Pocket Bag to Front Skirt.
Now finish the seam with a zig-zag stitch or serged edge.

Finished edge of the inside pocket seam.
Press the seam to either side but make sure to press on the front and the back to get a good, flat seam.

Pressing the pocket edge seam.
Turn the Pocket Bag towards the inside of the Front Skirt and press.

Pocket Bag pressed toward the inside.
With right sides together, pin the Pocket Inset (piece #7) to the Pocket Bag.

Pocket Inset pinned to Pocket Bag.
Attach the Pocket Inset to the Pocket Bag along the curved edge with a 3/8" seam allowance and finish the seam.

Pocket Inset attached to Pocket Bag.
Because we finished the inside of the pocket edge seam, you probably can no longer see the pocket opening notches. No worries, just place your pattern piece up to the edge and remark the notches.

Remark the pocket opening notches.
Now this next part is a little tricky. Not really but it's difficult to explain the positioning of the pocket inset so look closely at the next few images.
The photo below shows the Pocket Inset laying flat.

The photo below shows the above image flipped over to the backside and the Pocket Inset position is shown with the yellow, dotted line.

Next you will be pining above and below the pocket opening notches. On the wrong side of the fabric and on the Front Skirt side of the pocket edge seam, pin along the seam allowance from the top edge to the top center notch and again from the bottom center notch to the bottom edge. Then stitch in the crease line from the top edge to the top center pin and then again from the bottom center pin to the bottom edge - keeping the space between the notches open. What I don't show here is that you should backstitch or even bar tack the areas right around the pocket opening notches. These areas will take some stress when you have your hands in the pockets and should be reinforced.

Pinning and stitching the areas around the pocket opening.
In the photo below, you can see the areas that were stitched all the way through to the back side of the Pocket Inset.

Stitching through to the Pocket Inset.
Now turn your skirt front right side up and press the pocket seams in place. The stitching in the previous step makes the pocket opening small enough that it doesn't gap open as it would if the stitching wasn't there.
Baste the top waist and side seam of the pocket in place within the 5/8"/16mm seam allowances.
Repeat all of this for both Left and Right Front Skirts and Pockets.

Pocket opening.
Finish the side seams of both Front Skirts and the Back Skirt with a zig-zag stitch or serged edge.

Finished side seam.
9.
With right sides together, pin the Front Skirts to the Back Skirt (piece #5) at the side seams.

Attach the Front Skirts to the Back Skirt at the side seams using a 5/8"/16mm seam allowance. Press the seams open.
Note - just after this photo, I discovered that I had pressed my back waist darts in the wrong direction.

Side seams pressed open.
FITTING
We aren't actually ready to attach the bodice to the skirt just yet but..... you could pin or loosely baste the bodice to the skirt and try it on with the belt to get an idea of how it fits. Be mindful of where the front skirt facing turnbacks are. It will fit a little better once it's all completed but you can get an idea of whether you need to take in or let out the side seams or maybe shorten the hem before you go any further. If you do shorten the hem, you will need to taper the bottom to the same width that it was before so your hem facings still fit - or cut new wider hem facings.
10.
This is where it is really helpful to have your pieces labeled. I have messed this step up a few times because I thought I knew it well enough to get by without labeling but.... I was wrong.
With right sides together, attach the Right Front Hem Facing (piece #8) to the Back Hem Facing (piece #10) at the side seam using a 5/8"/16mm seam allowance. Then again with the Left Front Hem Facing (piece #9) to the Back Hem Facing. Be sure the pieces aren't turned upside down and are in the upright position.

Press the side seams open.
Turn down the upper edge of the facings 3/8"/10mm towards the wrong side and press.

With right sides together, attach the edge of the Right Front Hem Facing to the bottom Right Front Skirt edge - matching notches and keeping the hem facing folded. Use a 3/8"/10mm seam allowance and finish the long skirt edge with a zig-zag stitch or serged edge. Then press the seam towards the inside 3/8"/10mm.
Repeat with the Left side.

Hem facing attached to the front skirt edge.

A larger view of the hem facings attached to the skirt.
With right sides together, fold the Right Front Skirt back at the top and bottom facing fold notch and then again with the Left Front Skirt. Now pin the hem facings in place matching up the side seams and notches.

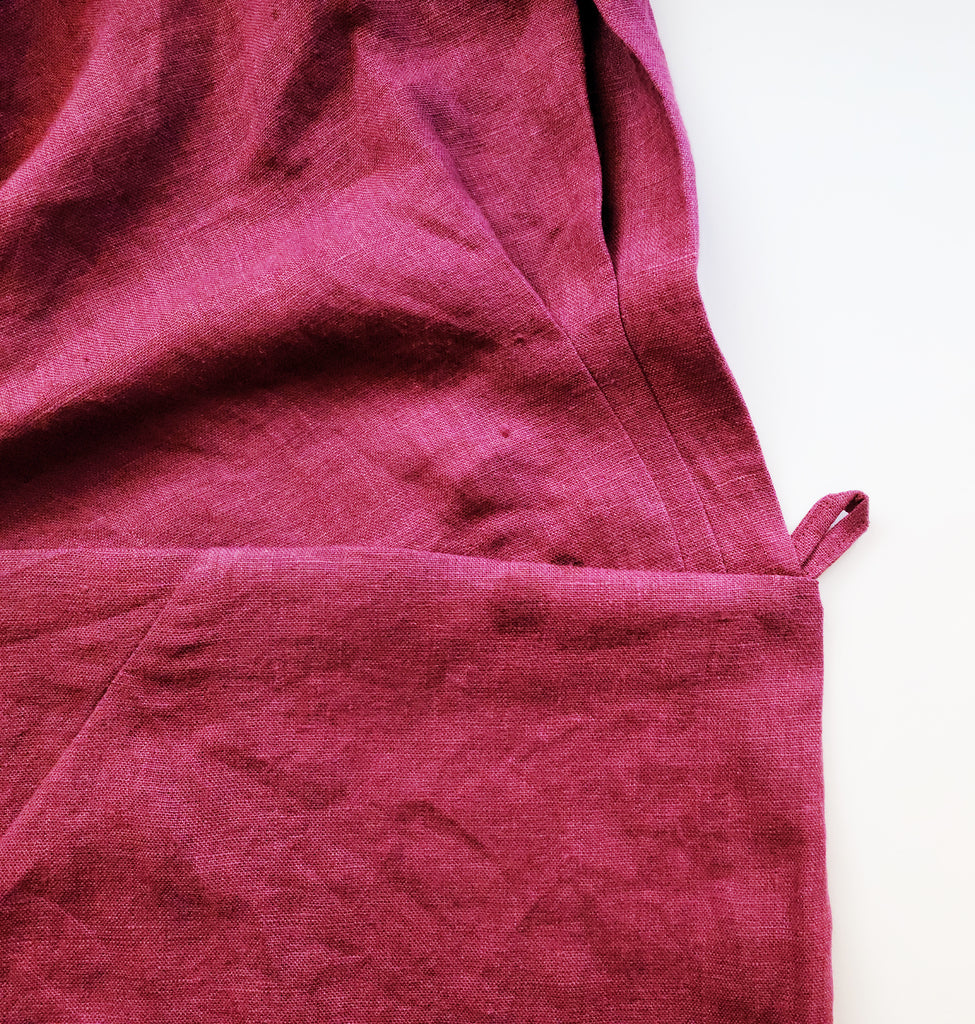
Hem facings pinned in place on the right side.

A full view of the hem facings pinned in place. Note that the left side turn back is wider than the right side.
Now stitch the hem facings in place using a 3/8"/10mm seam allowance.

Attaching the hem facings.
It's not required but I like to understitch the facing seam to the facings to keep them from rolling forward. Stitch on the facing side, close to the seam. You can finger press the seam towards the facings. Start and stop as close to the edge folds as possible.

Understitching the hem facing.

Full view of understitched hem facing.
Before we hem the skirt, we will attach the bodice to the skirt and then hemming the front openings through the hem towards the end.
11.
With right sides together, pin the bodice to the skirt at the waist. Match the notches and side seams and be sure to note that the left side has a much wider folded facing so you will be matching the front bodice edge to the second notch (the first notch indicates the fold for the facing). The right bodice will correspond to the first notch on the skirt waist.

Pinned bodice to skirt.
Stitch the waist seam together with a 5/8"/16mm seam allowance.

Left side waist seam.

Right side waist seam.
12.
Cut 2 waist ties - each at 21"/53cm long and knot one end. You can use twill tape or shoe laces - some sort of pre-made tie that isn't too bulky.

Inside ties cut to length.
Attach the unknotted end of one of the ties to the right side of the fabric of the Left Front Skirt at the fold notch.

Left tie.
Now attach the unknotted end of the other tie to the inside of the right side seam at the waist.

Right inside tie.
13.
To make the Button Loop (piece #13), fold both of the long sides of the rectangle in 1/4"/6mm towards the wrong side and press.

Then fold the Button Loop in half lengthwise and press.

Then stitch the Button Loop closed along the long edge and close to the edge.

Next fold the Button Loop into an arrow shape as seen below and press.

Trim the Button Loop to 1 3/4"/4.5cm in length. Then fold one end over the other and baste in place.

Place the Button Loop at the inside of the right front at the fold. Position the loop so that it is angled yet pointing down towards the skirt and it's raw edges are in line with the waist seam raw edges. Stitch in place back and forth a few times within the seam allowance.

Button Loop positioned and attached.
14.
With right sides together, fold the Left Skirt facing back on itself at the notch so that the folded edge just barely overlaps the corner of the bodice and pin in place.

Left Skirt facing folded and pinned in place.
With right sides together, fold the Right Skirt Facing back on itself at the notch (which is right where the bodice ends) and pin in place.

Right Skirt facing folded and pinned in place.
Finish the waist seam with a zig-zag stitch or serged edge.

Finished waist seam.
Turn the facings right side out.
Right side.

Left side.
Instead of clipping the corners on the hem, use small scissors or a point turning tool to fold it neatly to the inside. The complete, squared seam allowance will act as an interfacing to make a nice square point.

Turning the bottom hem corner.

Bottom hem corner turned.
Now press all of the facing seams from the long skirt opening fold backs to the hem facings and pin in place.

Pressing and pinning the facings in place.

Hem facings pinned in place.
Now stitch the facings in place from the inside, close to the facing edges.

Hemmed facings and bottom skirt hem.
Try the dress on and mark the best placement for the button on the left front skirt along the waist seam. Attach the button with a hand sewing needle and thread.

Attaching the button.

With a hand sewing needle and thread, attach the hook portion of the hook and eye to the inside of the right pocket. Position it so that the hook is facing up and the hook end is pointing towards the pocket's outer seam and place it somewhere just before the curve of the pocket starts - approximately 11 - 11.5" down from the waist.

The hook placement on the inside right pocket.
Measure how far down from the waist you placed the hook on the pocket.

Now using that same measurement, mark with a pin or chalk, where to place your eye or loop (of the hook and eye) on the left front skirt face.

Marking the eye placement on the left front skirt.
With a hand sewing needle and thread, attach the eye/loop to the left front skirt face with the loop or curved edge of the eye facing the edge of the skirt opening.

Hook and eye (loop) placement.

Hook and eye closed.

Press your dress, try it on and admire your work because you're all finished. Congratulations!
Thanks so much for joining in. Be sure to catch Kelly Hogaboom's livestream sewalong of the Wildwood Wrap Dress on her Facebook and Twitch accounts. You can find out more about that here.