

I have had so much fun participating in my first every Sew Indie Month! It's been an experience and I have met some great people through this event. Today I'm thrilled to post this tutorial by Betsy (the beauty in the photo below) of SBCC patterns. Betsy is all the way over on the other coast in New Jersey but today she's here on my blog via the internet. Betsy is a pro at making and adjusting patterns for petites and is going to show us how to adjust the Alberta Street Pencil Skirt pattern for a petite body. She also has a cool pattern hack for adding cargo pockets to the skirt (brilliant) and is showing us how to do that as well. Take it away Betsy!

Hi Sew House Seven followers! I'm Betsy from SBCC patterns. I design sewing patterns for petites. I was psyched to be paired up with Peggy for Sewing Indie Month and she has graciously allowed me to petite her Alberta Street Pencil Skirt, which I thought might be helpful for all the other shorties out there. I fit into a straight size 2, no modifications to body widths- It was great! However, the length was a bit too long for me and Mr. SBCC Patterns mocked me in a singsong Madmen Joan-esque voice "Phone call for you Mr. Draper," as I tried on the initial muslin. Now don't get me wrong, the vintage look is nice, just not so much for me, so I took a look at Peggy's product photo and worked out the right amounts to emulate the same on my 5ft 1" frame. Here's what I did:

It was super easy and quick to do. Satisfied with the fit and proportions, I was off to a pattern hack by adding cargo pockets. Madmen look, perhaps not me, but utilitarian, yes please! I love a good cargo pocket and they are surprisingly easy to do once you wrap your head around the sewing order. Also, in the case of the Alberta Street Pencil Skirt, you do not even need additional pattern pieces, just a strip of fabric. Here's how you can do it:
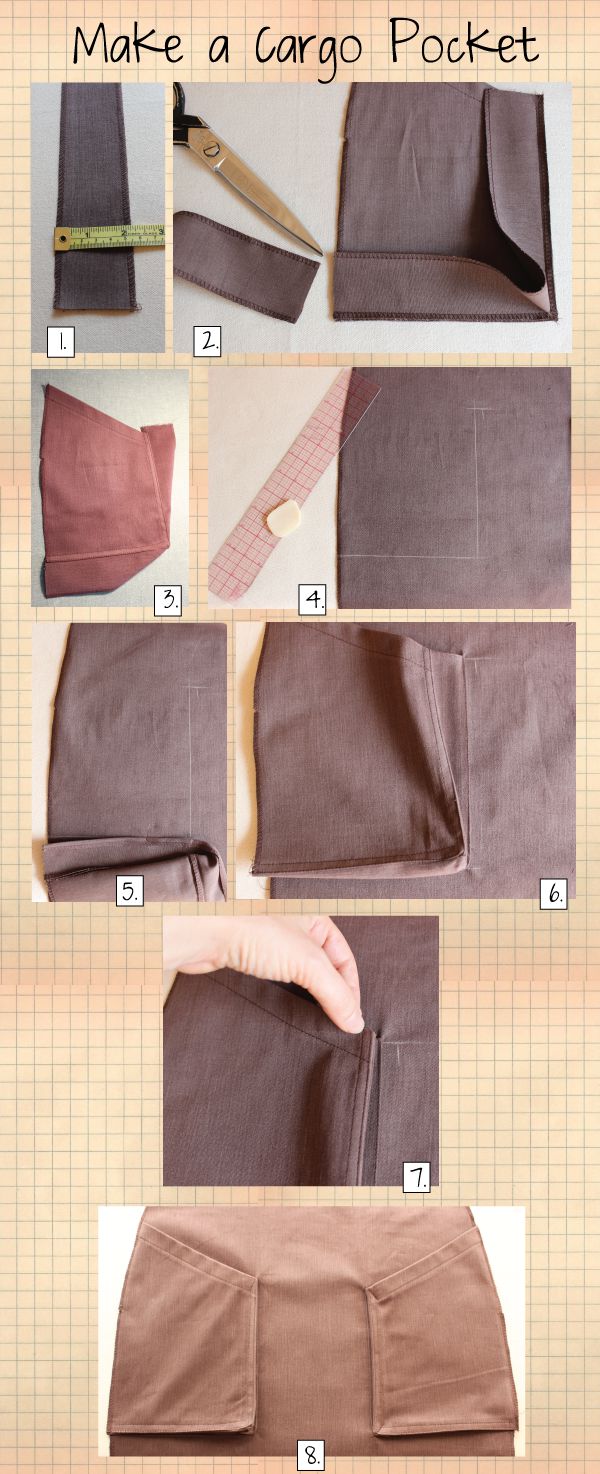
1) Measure around the outer edge and bottom of the pocket pattern piece (or if you like things quick like me, just cut a long strip that you know will be longer than your pocket edges and trim away later). For a decent size cargo pocket we are going to make the bellow (the center part) about 2" wide. Finish the edges with your preferred method for the pocket and the bellow.
2) Turnback the top edge (pocket opening) and topstitch. Extend the fabric strip/bellow piece about 1/2" above the top pocket opening. Take the bellow and position on top of pocket, right sides together. Sew the bellow to the pocket bag with 1/4" seam allowance. When you approach the bottom, position the needle at pivot point, making sure the needle is in the fabric. Lift the presser foot and clip the seam allowance diagonally to allow for a smooth pivot. Turn the fabric and stitch the bellow to the bottom of the pocket bag. If it extends past the pocket bag trim away the excess.
3) Turn pocket to right side. Edgestitch on the pocket face, all around where the bellow was attached, to secure the seam allowance to the pocket bag. You can also add another row of decorative topstitch at this point.
4) On the face of the skirt, mark the pocket position according to the pattern piece. Shift vertical markings in about 3/16". (I kept the bottom position, but I think you can even raise this 1/8" to give it a little more ease.)
5) Turn back the pocket bellow seam allowance 1/4" and press to make a sharp edge. Align the edge of the bellow to the pocket markings. Mark on the bellow where you will need to pivot.
6) Turnback the top extended edge of the bellow to match to the pocket opening edge and press. Align pocket bag to the skirt markings and start sewing on top of the folded edge all around to join to the skirt. Pivot at bottom and continue all the way to the edge.
7) At the top pocket edge, pleat the bellow so it folds inside. Tack in place with diagonal stitch.
8) If you would like a fuller cargo pocket, leave the bottom corner loose (left side). Or, if you would like only a small amount of fullness/dimension to the pocket, tack the bottom pocket edge (right side)
I hope you will give it a try! Thanks again to Peggy for being my SIM partner!
You're welcome Betsy and thank you too!