


![]()
Hello there sewists! A few days ago we talked about our Toaster supplies, and had a brief discussion on sewing with knit fabrics. Today, we are cutting our fabrics and sewing up our sweater version two! Version one also published yesterday.

CUTTING & LAYOUT
I adore this sweater - I've made four in the last week! - and one thing I love about it, is there are only four pieces!

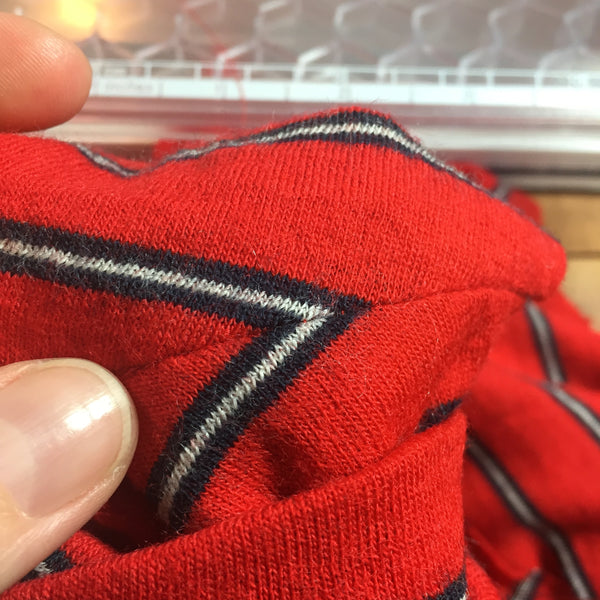
Stripes - when, and how to line them up? I generally line up stripes if the stripes are at least 1/4" wide - whereas if they're 1/8" or pinstripes (like this yellow shirt for my son), I don't bother. Lining up a knit top is relatively simple - I make sure the front and back armpit point is at the same vertical location in the stripe pattern. Your lineup will come into play in the neckline and at the vents, especially.
MARKING
Now - let's talk marking. This is a simple enough sweater, but the pattern markings need to be observed.
As per usual, I mark the front, right-side pattern piece with a safety pin, so it's easy to remember through the sewing process. I clip 1/8" at the fold line on the concave curve at the neckline facing. I also mark right on that folded edge at center front and back, at the fold-line marked on the pattern, using a thread tack:

It's important to properly mark the vent dot locations. Those will be important when seaming the side seams. Again, I used thread tacks:

NECK FACINGS & FINISHINGS
So - for version one, I used zig zag and double needle topstitching. For this sweater, I am making use of a serge. I like to serge the top neckline edge, and round the corner. This will help the inner facing lay well:

While I'm at it, I also serge-finish my front and back bottoms (around the corner up the vent long sides) and the sleeve hems.
Below, you can see my wee little thread-tack at the center front finished neckline. We are about to press the neckline facing to the wrong side, along that fold line (page 12 of the printed booklet & page 7 of the pdf version). Simply carefully fold from the little 1/8" notch in the concave curve of the neckline, down to the thread tack position. Patiently steam a very well-defined curve here.
Note from Peggy - It is really difficult to get your neck facing to fold in the correct place if you don't pre-fold it here before sewing the neck facings together. I learned the hard way.


Repeat for both front, and back of sweater.
Next, unfold the necklines we just steamed, and pin the curved neckline edge of the fronts, to the back. Pin well, and stitch carefully. These are important curves.

Remember when I talked about lining up the pattern pieces for matching stripes? This is evident at these curved facing seams:

I make three clips at this curved seam, as shown in the directions - then trim to 1/4":


Using steam, I lightly press these seam allowances open on a sleeve board:
A new discovery - you may try using a double sided fusible tape such as Steam-A-Seam 2 at the neckline facings. It helps keep the facings in place and doesn't show up on the outside. See the blog post from November 5th 2018.

Now - here we are directed to crackstitch (or "stitch in the ditch") from the right-side of the shirt to anchor the facing. That is certainly an option - pin well, and stitch. However I elected to use a delicate backstitch/prick stitch instead:

With most handstitching - we want the thread to float between layers. Don't yank and pull tightly! Just a few stitches are needed to anchor this lovely neck structure.

SLEEVES TO BODY
(page 13 printed booklet, page 8 pdf version)
Now, it's time to pin our sleeves! I pin with the pins facing on the body-side of the shirt, as I'm going to use the feed dogs to gently navigate the convex sleeve curve:


Before finishing this seam, double-check there are no tiny pleats or tucks in this seam:


Finish the seam, then lightly steam-press:


SIDE SEAMS
(page 14 printed booklet, page 9 pdf version)
Now - time for side-seams! We will be stitching from the sleeve hems, to the marked vent dot on the lower part of the sweater.
Since I have a striped fabric, I meticulously pinned at every stripe. It's worth the extra couple minutes:

I also seamed from the same direction - in this case, hem to sleeve hem. This is to help the seam allowances point in the same direction - toward the wrist:

Once you're satisfied with this seam, carefully clip right to the seam termination point at the vent. Go ahead and finish your side seam; if you serge, you can pull the serge-tails into the serged seam allowance itself for a very tidy finish (picture below shown just after the serge, but before the tails were hidden):

MITERING THE SIDE VENT CORNERS
(page 15 printed booklet, page 10 pdf version)

Now - time to fold the mitered corners, right-sides together, right along the marked fold location. You know, I kept accidentally folding wrong-sides together - so double check that you're folding correctly! Pin, sew, and trim:


Either finger-or steam-press these seams open, then fold the vent into a magical mitered corner! Pin well, using a little steam to really set your hems:
HEMMING
(pages 15 - 16 printed booklet, pages 10 - 11 pdf version)

Making sure your seam allowances are nice and even, go ahead and stitch your hemline. You'll be stitching around the entire hem, including up and around the vents, as shown in the pattern directions.
I like to sew from the wrong side, so I can really anchor that serged seam. I also fiddled a bit to make sure the majority of my hem stitch fell in the red part of the fabric, not the blue and white stripe:


Now - fold up the sleeve hem to the wrong-side, and do the same!


Gorgeous hem results!

So - there we go! All done.
