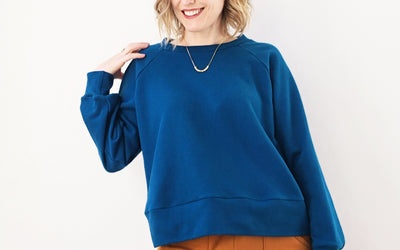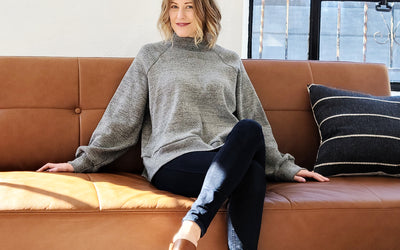
Welcome to the Cosmos Sweatshirt sew-along for Version #1, Sleeve A. Before you start, just know that while a serger is great for knits, it is not required. Just be sure to use a ballpoint sewing machine needle and please review the section on page 2 "Sewing With Knits - 3" of your instructions to help determine what stitches to use on your standard sewing machine.
Attention - If you are sewing Version #1 but with Sleeve B, just skip the sleeve hemming portion of this tutorial and go to the Version #2, Sleeve B tutorial for the Sleeve to Cuff instructions.
Anyhow, the image above is of me in my bamboo/organic cotton French terry sweatshirt that has been cropped/shortened 1" and the sleeves have also been shortened 2" so that they are 3/4 length. I had originally designed the sleeves this way but after pattern testing, I decided to make them wrist length so that people can choose to shorten them or leave them longer. Here is what this version is supposed to look like before all of the pattern shortening.

I have included photos below of how I shortened the sleeve pattern. You use the same method for shortening or lengthening the body as well.

This is the "Print At Home Pattern" that I taped together in size 4. You can see the lengthen shorten lines on the sleeve.
Cut the sleeve pattern completely apart horizontally at one of the lengthen/shorten lines.

On the upper half of the sleeve, use a ruler to measure the amount that you want to reduce or shorten your sleeve and mark the line horizontally with a pen or pencil. If you are adding length, tape the piece to a scrap of paper and mark below the cut line on the paper the amount you want to add.

You can see from my sloppy writing above that I've marked the line 2" above the cut line. That is how much I will be shortening the sleeve by moving the bottom half of the sleeve pattern to meet this line and tape in place.

Here is the finished, shortened sleeve pattern piece after taping the two halves together.

Now on with the sewing. First, let's mark the back neck of the funnel neck so you can tell the Front from the Back. It's really easy to get them mixed up and you NEED to mark the back somehow and preferably before you finish your garment. Here I have added a label - 5/8" away from the cut edge, centered and upside down as it will read right side up once the self facing is turned down. Believe me when I tell you that it's much easier to add the label now rather than when your sweatshirt is finished. If you aren't using a label, you can also mark the piece with a thread tack or knot or any other creative way to indicate the back. Just remember that the edge will be turned down 3/8" later so you could also use a temporary safety pin and replace it with the thread knot when the garment is finished.

With right sides together, attach the Front to the Sleeve aligning notches. Repeat with the second Sleeve.

Press the seam towards the sleeve.

With right sides together, attach the Back to the Sleeve, aligning notches. Press the seam towards the Sleeve and repeat with the other Sleeve.

All Sleeve to Body seams completed.

Before you sew your side seams, turn up the Sleeve hem 1" /2.5cm and press. Repeat with the second Sleeve. Unfold the hem before sewing up the side seams. If making Sleeve B, see the cuff instructions on the tutorial for Version #2, Sleeve B.

Now unfold the hem before sewing the side seams.

With right sides together, attach the Front to the Back at the underarms and side seams. I like to start at the bottom hem and sew up to the underarm, pivot and continue down the sleeve. I like to start at the bottom hem because it makes it easier to keep the seam allowance pressed towards the sleeve when you get to the underarm but you can also do it the other directions.

Press the seams flat to help shrink up any stretching or rippling that may have occurred before pressing the seams towards the back.

Now you can turn up the Sleeve hem again at the pre-pressed crease line and press again. Or start the Cuff assembly process if making Sleeve B (tutorial #1).

I will be hemming using a double needle aka twin needle. The double stitching with the bobbin thread zig-zagging between them creates a nice stretch stitch. I'm not sure if the needle shown below is for knits or not but this is what one looks like. They come in different widths as well (needle widths apart). You don't have to use a double needle. You can use a zig-zag stitch to hem as well (see section 3 under "Sewing With Knits" on page 2 of the instructions to help you choose a stitch.

If you do want to try using a double needle, you simply use two spools of thread and thread them together through the machine the same way you thread one until you get to the needle and then one thread goes through one needle and the other goes through the other one. Your one bobbin is used the same as if you were using a single needle.


Finished 2-needle hem.

For the Bottom Band, I like to use my regular sewing machine and sew a straight or a very slight zig-zag stitch that is almost straight so that I can press the side seams open to reduce bulk but you can also use a serger - just know that the side seams will be bulkier.
Attach the Front Bottom Band to the Back Bottom Band at the side seams using a straight stitch or slight zig-zag stitch recommended at approximately .5mm - .7mm wide and 3 mm long). A straight stitch is probably fine because the bottom band is loose and doesn't get stretched so there isn't much chance of popping a stitch but you can use your serger as well and press the seams towards the back.

Now fold the Bottom Band in half so that the raw edges are together and press.
Attach pins at the center front, center back and side seams.

With right sides together, attach the Bottom Band to the sweatshirt body's bottom opening. I highly recommend basting the Bottom Band onto the sweatshirt with a very long straight stitch. Then try on the sweatshirt to make sure the Bottom looks right and not too loose. This is a one to one ratio meaning that the Bottom Band is the same width as the sweatshirt bottom opening. However, if you are using a stiffer fabric (some cotton knits) your Bottom Band may result in a "winging out" appearance - standing away at the center front and center back. Basting allows you to unpick the stitches and adjust the Bottom Band if needed. See the tutorial for Version #2 to see how to trim down the Bottom Band width and stretch it to fit the bottom opening to remedy the "winging out".

Basted Bottom Band.

If the fit is good, go ahead and secure the Bottom Band with a serger or your choice of knit stitch.

Now you are ready to finish the funnel neck. Using a fusible knit tape is optional. If you do use fusible tape, I highly suggest Lite Steam-A-Seam - 1/4". Be sure to use the lite version as the non-light version is too thick.
If not using fusible tape, skip down two photos.

Apply the fusible knit tape in small 1/2" - 3/4" (13mm - 19mm) pieces placed at the center front, center back and over each seam and very close to the cut edge. Apply according to the manufacturer's directions using your iron. Do not apply the fusible tape all the way around the neck edge as this will restrict the neck opening.

Peel off the paper backing of the knit tape and turn down the top edge of the funnel neck 3/8"/10mm and press in place fusing the tape to the garment. If not using fusible tape, you can use a hand sewing needle and thread to hand tack down the folded edges in place at the four seams. Do not continuously stitch the neck edge as it will restrict the neck opening.

Try on your sweatshirt and mark how far to turn down your neck facing. You want it turned down at least 1 3/8" /3.5cm so that the facing doesn't roll out. You can turn it down more if you prefer more of a mock-neck look.
Now turn the sweatshirt inside-out, pin the neck facing in place and press.

With a hand sewing needle and thread, tack the neck facing in place at the seams and within the seam allowances so that the stitching is invisible from the outer side. Do not stitch continuously around the neck as this will restrict the neck opening.

Give your garment a good steaming and your finished!

You did it! Your Cosmos Sweatshirt is complete!
We would love to see your sweatshirt on social media if you choose to share.
#cosmossweatshirt


