


Meet the multi-talented Digital Content Creator, Blogger and Pattern Designer Alexis Bailey who is our guest host for the Mississippi Avenue Dress tutorial. Alexis has made a gorgeous tropical print Mississippi Dress that is absolutely perfect for summer. She will guide you through this tutorial so you can make your own dress.
You can spend more time with Alexis by checking out her sewing blog, her shop Fibr & Cloth Studio, following her on Instagram or listening to her guest episode of A Coffee With Makers Podcast .
I should bring to your attention that the armhole and neck bias facings for this pattern are a bit wide. This was the first pattern I released seven years ago and at the time, I thought it would be good to have some excess in the facing width, however, I now feel that it could be a bit wide. If you want your stitching to come right to the edge of the facings, you can trim the bias facing pattern pieces down in width 1/4"or take a 1/2" seam allowance at the arms and neck instead of 3/8" or you can leave it as is with a little excess facing width.

I will let Alexis take it from here.
Hello everyone!
BEFORE YOU BEGIN…
Gather your supplies
- Sew House Seven Mississippi Ave Pattern
- Fabric corresponding to size per pattern size chart. A fabric with some drape such as a rayon challis, rayon/linen blend or light weight cotton or linen that isn't too stiff is recommended.
- Matching Thread
- Elastic (1 yard, ⅜” wide)
- 2 sturdy safety pins
- Scissors
- Sewing Machine
Cut your pattern
- Cut your pattern by placing your cut pattern pieces on top of your fabric and cutting around the paper pieces. Pattern pieces should all be facing in the same direction on the fabric - especially if you are using a one-way print.

- I will be making view C of the Mississippi Ave pattern but the instructions apply for all views.
- Note that the seam allowance fluctuates throughout the pattern for specific instructions
- Finish all seams with a zig zag stitch or serger depending on your preference)
SEWING THE BODICE AND SKIRT
1 a. Staystitch the armholes, neck edges and center front piece edges by stitching ¼” away from the edge along each edge. Use the instructions as a guide for directions on how to do this and limit warping.


2 a. With right sides together, attach the front bodice pieces to the back bodice and sew along the shoulder and side seams using a ⅝” seam allowance. 
3 a. Then with right sides together, attach the front skirt pieces to the back skirt and sew along the side seams using a ⅝” seam allowance. 
3 b. With right sides together attach the bodice to the skirt at the waist, matching the side seams. Sew using a ⅞” seam allowance and press downward. 
3 c. Lay the waist seam allowance flat towards the hem and pin the edge to the skirt. Sew the seam allowance edge to the skirt using a ⅝” seam allowance creating a tunnel for your elastic. 

INSERTING THE ELASTIC
3 d. Measure your elastic 2” smaller than your waist measurement. Attach a sturdy safety pin to the end of your elastic and insert it through the tunnel of your dress until you reach the other end. 


3 e. On the side that you initially inserted the elastic through, tack the elastic down just outside of the tunnel opening so that it does not pull through. 
Keep the safety pin attached to the other end and make sure it does not slide back through the tunnel . 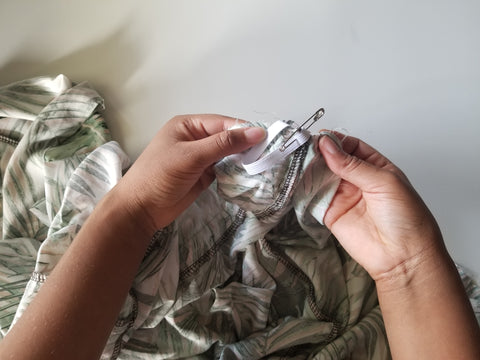
3 f. With right sides together attach the center front to the corresponding dress front at the diagonal seams using a ⅝” seam allowance. On the side where the elastic was tacked down, sew the center front down the length of the top/dress. On the side where the elastic is safety pinned, sew down to the waist tunnel and end your stitching (backstitch to hold the stitches in place). Begin stitching again just after the waist tunnel and continue down the length of the top/dress. 

3 g. Try on your dress and use the gap where the elastic is sticking out to pull and adjust the elastic to preference. Use the guide in the instructions to consider how the dress should fit. Once you are satisfied with the fit, sew the gap closed. 
4 a. Now let’s work on the neckband. With wrong sides together, fold the neck facing in half lengthwise and press. 
FINISHING THE NECKLINE
4 b. The instructions begin this next step on the wearer's right side, but for ease of sewing I recommend beginning on the wearer's left side. With right sides together matching raw edges, pin one end of the neck facing to the center front V of the bodice leaving a 1” extension past the center. Fold the end of the neck facing down along the raw edge about ¼” and 1 ¼” in length. This will prevent the raw edge from showing when the facing is finished. This part can be tricky to show so here is a link to another neck tutorial for additional images.

4 c. Attach the rest of the binding to the bodice neck overlapping the end of the facing over the folded end and pinning in place. Beginning at the center front, around the back and returning to the front, sew the facing using a ⅝” seam allowance. Trim the excess facing. Clip into the center front seam at the V. 


4 e. Zig Zag or finish the raw edge of the outer V with your preferred finish. Trim the seam allowance to ¼” around the neckline. I like to do this with a rotary cutter 

4 f. Press the seam allowance of the neckline away from the seam, towards the facing. Understitch ⅛” away from the seam. 
4 g. Turn the facing to the inside and press into place. Press the center front very well so that is does not have any puckers. 
4 h. Use a pin to mark the center front so it is marked a reference point when pivoting your stitching. Topstitch around the neck ¼” from the edge, making sure to pivot at the center front 
5 a. With wrong sides together fold and press both armhole facings lengthwise. Fold one end of each armwhole facing in ⅜” and press 
FINISHING THE ARMHOLES
5 b. Beginning at the underarm seam, raw edges together, begin attaching your armhole facing to the armhole by starting with the folded end (fold facing up) and then continuing around the armhole until you come back to the beginning. Overlap the facing by ½” and cut off the excess. Tack down the overlap of the facing vertically 


Repeat for the armhole facings then turn the facing to the inside and press. Top Stitch ¼” from the edge.
CREATING THE SHOULDER TIES/ HEMMING
6 a. With right sides together fold each shoulder tie in half lengthwise and sew down the length of each tie using a ¼” seam allowance.

6 b. Attach a safety pin to one end of each shoulder tie and insert the safety pins through each tunnel/tie to turn it inside out. Press the ties and knot the ends. I personally like to turn in each end of the ties ¼” twice and then topstitch the ends in place.


6 c. Find the center of each shoulder tie and place them on the underside of each shoulder. Pin to keep them in place. 
Tack the shoulder ties down by stitching in the ditch along the seamline for the top/dress shoulder. Tie the ties around the shoulder 

7 a. Hem the bottom of the dress by turning up the raw edge ⅜”, pressing, and then another ⅝”, pressing again. Sew the hem using a ½” seam allowance. 
#mississippiavenuedress
