


Hello Everyone!
Well it's long overdue but I am finally getting around to posting the Remy Raglan tutorial. Right before I released the pattern in the spring of 2020, I had taken photos for a planned sew-a-long. However, somehow I lost the photos and never got around to remaking the top and retaking the photos. It's a pretty simple make but the neckline of version #2 can be a little confusing so it was worth circling back and posting the tutorial.
The Remy works best in linen fabrics because the ease of linen makes the neckline nicer and the sleeves stay rolled up not to mention the drape and beauty that linen offers. And by the way, the sleeves were meant to be rolled up and look best that way in my opinion.
Other than fabric, I am going to skip over supplies etc and jump right in to the sewing. I am going to be sewing version #2, however, you can still follow along if you are making version #1 as I will explain where to skip and what to do if you are making the simpler, plain front Remy. I am sewing this one up using some scraps so the body is brown linen and the sleeves are white linen. I apologize if the white doesn't show up well. I will also be using white thread for topstitching so that it is easier to see what I am doing and where the stitches are placed. Now on with the sewing.
If you are making version #1, skip ahead to step 3 a.
1 a. We will start by turning up the long sides of the button loop (piece #7) 1/4”/6mm towards the wrong side and press.

1 b. Now fold the button loop in half lengthwise and press.

1 c. Stitch the button loop together lengthwise close to the edge.


1 d. To form the loop, first hold the button loop so that the ends are butted together, side by side. Notice how the center loops around. Well if you flatten that loop with your fingers and then press with an iron, it forms a kind of arrow shape.

The front side of the button loop after pressing.

The back side of the button loop after pressing.

1 d continued. Using a ruler or tape measure, trim the button loop so that it is 1 1/2"/4cm long. You can make the button loop longer if you are using an extra large button.

1 e. Overlap one end over the other and baste the ends together.

2 a. On the wrong side of the fabric, mark the center front stitching stopping point by adding a dot with a fabric marker, chalk or pin. Place the mark 3/4”/ 2 cm across from the center notch on the split front (piece #2). Mark the point on both front pieces.

2 b. Now fold the center front edge of the front piece 1/4”/6mm in toward the wrong side and press. Repeat this with the second front piece.

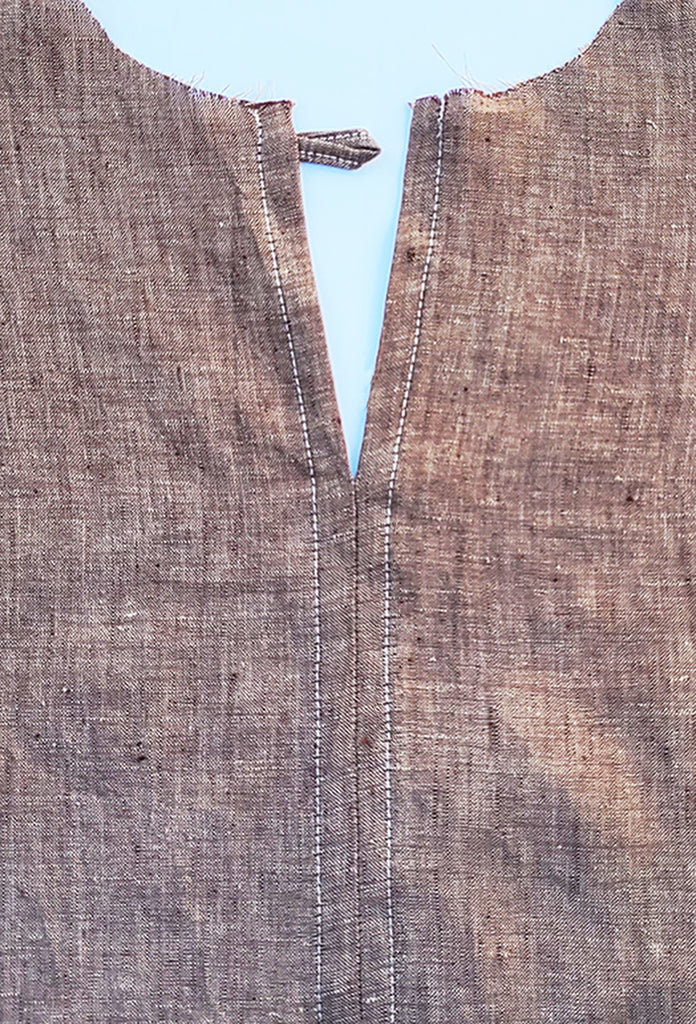
2 c. With right sides together, attach the front pieces together at the center front seam. With a 1/2”/13mm seam allowance (1/2"/13mm from the folded center edge). Start stitching at the bottom and stitch up to the dot near the top center front neck.

2 d. Lay the front open, wrong sides up and press the seam open all the way up through the split front opening.

2 e. On the right front, unfold the top center front, turned back seam allowance and attach the button loop 3/8”/10mm down from the top with the raw edges of the button loop aligned with the inner folded edge. Stitch it down again just to the right side of the fold line on the seam allowance.
You may want to place the button loop down 1/2"/13mm. The instructions say 3/8"/10mm and in order to keep the button loop within the area that the neck facing will cover once its sewn on and hemmed. However, 1/2" allows for a little more room to sew the facing seam - just be sure to keep the button loop within a 3/8" area.

2 f. Lay the front flat with right sides up. Stitch down the turned back center front seam allowance 3/8”/10mm away from the center front seam on each side. However, sometimes seam allowances end up slightly smaller or larger than we planned so you can also topstitch the center front seam from the inside side and just stitch at the edge of the fold.
3 a. French seams - With wrong sides together, attach the sleeve (piece 4 or 5) to the front using a scant 1/4”/6mm seam allowance. Trim any fraying fabric threads and edges so that the seam edge is very close to the stitching.

3 b. I then press the seam to one side before folding the seam back on itself so that the front body and sleeve are now right sides together and press.

3 b. continued. Enclose the raw edges of the first seam by stitching 3/8”/10mm away from the folded seam. Repeat with the second sleeve.

The instructions say to press the seam towards the sleeve. That is what I usually do but it is really just your preference - as long as you are consistent. Because I have used a light-weight white linen for the sleeves here, I have decided to press the seams down towards the body so they don't show through.

Here are the seams pressed down and topstitched in place. Topstitching is optional.

3 c. Attach the back (piece #3) to the sleeve using the same French seam method described in steps 3 a - 3 b. Press the seams in the same direction you chose for the front seam. Repeat with the second sleeve.

3 d. I like to pre-press the sleeve hems before the side seams are sewn up. It just makes it easier while it's flat.
Lay the body out flat with the wrong side up. Turn the sleeve hem up 3/8”/10mm and press. Then turn the sleeve hem up again 1/2”/13mm and press. This will make hemming easier once the side seams are completed.


If you are making version #1 - With right sides together, pin the bias neck facing (piece #6) to the neck edge and stitch in place leaving a gap about 1”/2.5cm at the shoulder where the facing ends meet - 3/8”/10mm seam allowance.
Then pinch the two ends of the NECK FACING together so that the gap is covered and stitch in place.
Press the NECK FACING seam open and continue stitching the gap closed.
Version #2
4 a. Fold the end of the bias neck facing 1/4"/6mm towards the inside and press.
By the way, I noticed a mistake in this step in the instructions - 1/4" is not 13mm but rather 6mm.

4 a. continued. With right sides together, pin the bias neck facing to the neck edge starting and ending at the center front neck split. Fold the ends back 1/4”/6mm (trim any excess facing) and stitch in place with a 3/8”/10mm seam allowance.


4 b. Clip the curves around the neckline. Clip close to the stitching, taking care not to clip through the stitching.

4 c. With the seam allowances pressed towards the neck facing, we will understitch the neck facing so it doesn't roll out towards the front of the garment. Do this by stitching along the seam edge of the neck facing, catching the seam allowance underneath.

And here is the finished understitching as it appears from the outside.

4 d. Turn the neck facing edge up about 3/8”/10mm or until the edge meets the stitching. Continue along the entire neckline and press.
4 e. Be sure that the seam allowance is tucked inside the turned up edge.

5 a. Turn the neck facing toward the inside. Press and pin in place.

5 b. Stitch the neck facing down, about 3/8”/10mm away from the finished neck edge making sure that the button loop is fully enclosed in the facing.
This is also a good time to attach a label to the center back. You can catch it in the seam. I forgot to add mine and so I ended up hand tacking it in place at the end.

6. Now unfold the sleeve hems and with wrong sides together, pin the front to the back at the underarms and sides.

6. continued. Now using the French seam method described in steps 3 a - 3 c., stitch from the bottom, up the side, through the underarm to the end of the sleeve.

Trim any excess or frayed edges.

Press

The side seams are now French seamed and the raw edges are fully enclosed. Press the seams towards the back.

7 a. Turn the bottom hem up 3/8”/10mm toward the inside and press. Then turn up the bottom another 1/2”/13mm and press.

7 b. Stitch the hem in place 3/8”/10mm away from the bottom edge. Press.

8 a. Turn up the bottom sleeve hems where they were prepressed in step 3 d. Repeat with second sleeve.

8 b. Stitch the hem in place 3/8”/10mm away from the bottom edge. Press. Repeat with second sleeve.

With a hand sewing needle and thread, attach you button to the left center front. I usually place it at the intersection of the neck and center front topstitching. However, if your button is large, you may need to place it a little lower. I usually use a button that is around 20mm but you can go up or down in size a bit as long as it fits within the button loop.
Roll the sleeves up and you're finished! You may need to tack the rolled sleeves in place if you find that they don't stay up but I like to be able to iron them so I keep them untacked.
I hope you enjoyed sewing your Remy Raglan top!
