


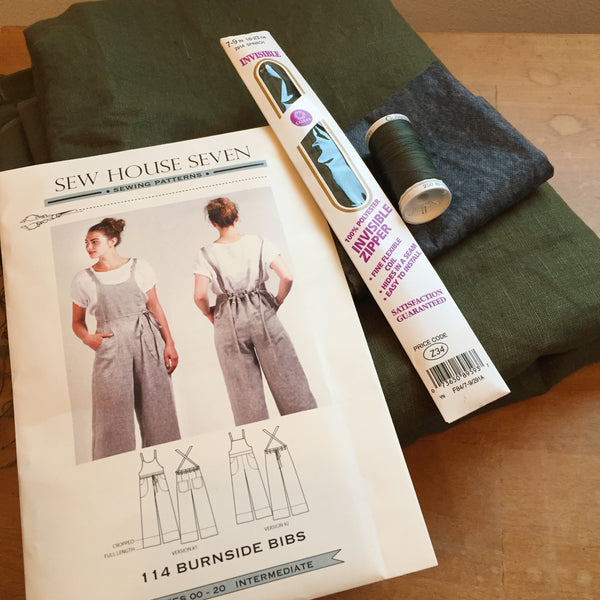
I've made the Burnside Bibs a handful of times - including twice in knit fabrics, which is a lot of fun. Every time I've made them - for myself or someone else - I get a lot of positive feedback. People instantly recognize that they are adorable, functional, and comfortable!
And because these are a Sew House Seven pattern, we have wonderful illustrations and directions. I have always said that SH7 patterns are little tailoring tutorials in and of themselves. A committed beginner can step through this pattern, as long as they are able to cut, mark, and sew accurately. I think that's pretty fantastic!
Enough fangirling, let's get started!
First: a few notes. I am using a lovely 100% linen here Linen is probably the top choice fabric for Burnside Bibs, if you're going off what we see on Instagram. Linen handles, sews, and presses very well, and yields those luxurious trademark wrinkles upon wear (that many people love and some people loathe). If you use linen, be mindful during pressing. Linen picks up a sheen from the hot iron very easily. Use a press cloth to be safe.
I am also using a matching thread for both construction and topstitching. To the extent that you use a contrasting topstitching thread, you will have seams and details that pop more. In my opinion, this yields a more casual or "work pants" look (like dungarees). If you plan to use a contrasting topstitch I recommend a heavier thread and a topstitching needle. If you are insecure about your topstitching skills, use a matching thread and make your practice pair for accuracy!
Okay - let's go!
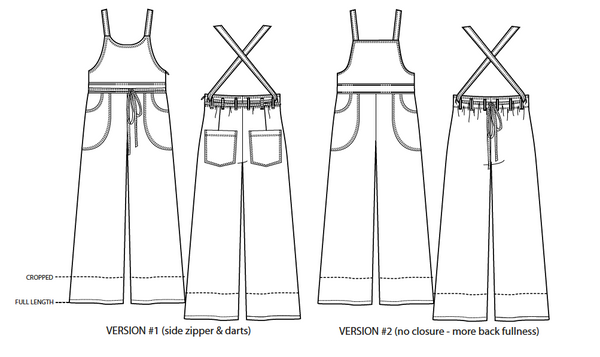
The Burnsides have two bib options: a scooped neck or straight front. Both these bibs can be used with either version. Version #1 features a slightly fitted back pant with back waist darts and an invisible side zipper opening. Version #2 features a looser back, which omits the need for a closure. Both versions feature ties that loop around the front and gather the back waist. Both versions also feature a front waistband, curved front patch pockets, optional back pockets, and cross-back strap. The legs are boldly stovepipe and can be made full-length or cropped.
Size selection is relatively simple. Because even the more fitted version #1 has a somewhat gathered back waist, the hip measurement is probably the most important measurement. I would suggest selecting the size that correlates to your hip measurement unless your waist is larger than your hips. The adjustable straps and open back make the bust not so much of an issue unless you are quite full in the bust and would like to grade up for your front bib.

Fabric requirements are as follows:

Once we have our size selected and have cut out our paper pattern to size, we need to determine which pattern pieces we will use. I used a highlighter to mark the pieces I'd need, for Version #1 (with a straight bib):

When cutting my paper pieces, I like to mark my interfacing pattern pieces with a highlighter, to easily find them before cutting them. These pieces are cut from interfacing, instead of from the garment fabric:

Once we select our size and cut our paper pattern (making sure to heed the pant length we want), we need to make our notches, dart marks, and pocket placement marks. There are back darts in Version 1 but none in Version 2. I like to mark the darts and pocket placement locations with thread tacks.

And finally, our notches! The Sew House 7 patterns usually use 5/8" seam allowances, which means we can confidently snip our 1/8" notch positions into the fabric raw edge.

Now, we get to make our first stitches on the machine (step 1)! We will be making our front pockets. First, finish the outer edges of both the outer pocket edge and the outer pocket facing edge:

Next, stitch the inner curve of the pocket facing to the pocket, right-sides together. Clip, and press the seams toward the facing on the wrong side:

Topstitch the pocket opening with a single, double, or triple topstitch - your choice:

Next, we will be pressing the outer edge of the pocket and achieving a smooth curve by first making a basting stitch along the outer curved edge (step 1 f.). Pull the thread tails slightly and this will help your edge curl up so it turns under more easily. Now gently press the seam up. Take your time with this, to get a smooth curve. Remember to use a press cloth, if necessary!


Don't worry too, if you can't get that pocket curve absolutely perfect. If your topstitching line is smooth, curve irregularity will not be noticed.


Now, pin the pressed pocket to the front pant, on both sides (step 2.) and stitch down along the outer curve, finally finishing with a baste stitch at the raw edges:


Next, finish the raw edges of the pant front along the rise, inseam, and outseam - in other words, all edges except the waist (step 3a.).
Pin and stitch the front rise of the pants together from the top raw edge, to the notch - you will finish the rest of the rise later. Press this seam open:

Your pant front is finished! Admire your work, then set it aside.
Now, we will be working with the waistband and bib.
First, turn down the top edge of the waistband to the wrong side, and press:

This next part is a tiny bit confusing, as we are making a "sandwich" out of the finished pant front, the bib, and the waistband. But as long as you follow the pattern instructions, you will be fine!
Pin the bib piece, pants front, and the waistband together (don't worry about the inner facing bib piece yet). Layer the pieces as follows: bib upside down and wrong side up, then the pants right side up, and the waistband wrong side up with the unfolded edge facing down:


Go ahead and stitch that waist seam, catching all layers (step 4c.):

A bonus tip here: I like to grade this seam (trim the seam layers individually and so that they graduate so as to reduce bulk):


Now, press the waistband up so it nestles against the bib, with the folded edge down. Press gently. This is looking great, no?

Single, double, or triple topstitch the waistband at the waistband top and waist seam. One pass of stitching on the bottom will be done later when the facing is attached (step 4e.):


Put the overall front aside.
If you are making Version #1, it's time to form our darts! Fold the pants back right sides together, along the dart lines. Stitch carefully from the raw edge to the dart point, drawing long thread tails out and knotting them at the dart tips:

Gently press your darts (using a tailor's ham if you have one) with your press cloth, and set aside your back pant pieces.
Now it's time to make those back pockets! These are so satisfying. First, go ahead and finish all the pocket edges except for the top edge:

Fold your top pocket edge down 3/8" to the wrong side, and press. Then, fold this pressed edge towards the right side along the notches, and press:

Stitch just this top facing edge down at 3/8" (step 5c.):

This lovely little 3/8" seam can now be turned right-side out, and used as a guide to fold the rest of the pocket edges down 3/8" and press (step 5d.):


At this juncture, you can topstitch the top, sides, and bottom of the pocket (step 5 e.). I elected to omit this topstitching.
Now, pin the pocket to the back pant, aligning the marked dots and pinning with six pins, so that the pocket does not shift as we sew it:

Topstitch the pocket along the sides and bottom of the pocket, using the edge of the foot for a guide. You can single, double, or triple stitch the pocket down - or use a zig zag stitch!


Finally, reinforce the top pocket edge. Here it is before reinforcement:


And here it is after reinforcing by several straight stitches, back and forth, with black thread. Lately I have been enjoying stitching pocket reinforcement and belt carriers this way, rather than the more traditional zig zag bartack:

Much like the front pant, go ahead and finish the seam allowances of the back pant along the rise, inseam and outseam (step 7a.). Next, pin the inseams of the front assembly to each back pant piece, right sides together. Stitch (step 7b.) and press open:

Now, place the pant backs right sides together, and stitch from the raw edge of the pant back up to the notch on the front pant, aligning the inseams (what should be step 7c. however, there is a type-o and it says step 7a. at the bottom of the page):

At this point, the overall is a bit unwieldy! But that's okay. We are more than halfway through.
For Version #1, we are going to install the zipper (if you are making Version #2, skip the next four photos). First, we take our invisible zipper and open it, then iron each side of the zipper tape, pressing the coils flat and to the center of the zipper. This is standard procedure for invisible zipper application:


With right sides together, pin the left side of the zipper tape to the left side of the front pant bib (step 8b). Place the top of the zipper tape right at that raw edge. The zipper teeth will fall about 5/8" from that raw edge of the side seam:

I usually apply an invisible zipper with an invisible zipper foot (these are inexpensive and easy to find), but in case you don't have one, I am demonstrating this application using a regular zipper foot. It is possible to get the stitching either too close or too far from the zipper teeth. Too close, and the zipper will not zip up (but don't worry, this is easy to test after each seam. Too far, and the zipper won't look too glamorous upon zipping it. Try not to sweat it. Just do your best! You'll soon discover the "sweet spot" to stitching this zipper tape down.

The instructions (step 8d) say to "rotate the zipper 2 times to the right" to then pin the remaining tape to the right side. The diagram is fabulous. I have found it helps to pin this location, then zip the zipper up carefully to make sure I haven't sewn a twist into the pant, or the zipper tape (this will also verify that you didn't stitch too close or too far from the zipper teeth). Stitch the second side of the zipper tape to the seam allowance (step 8e). The finished result should truly be - invisible:

Perfection is nice, but as long as the stitches are strong, it's probably good enough! Go ahead and tack the zipper tape down (step 8g).
Moving on, the following diretions apply to both Version #1 and Version #2. We are now closing the side seams (step 9), and preparing the facings!
Did you notice when we cut out our pattern pieces, that the interfacing pieces were similarly sized but a bit smaller? This is to nestle the interfacing inside the fabric pieces. Fuse as per manufacturer's directions:


Next, stitch the back waist seam of the facings, and press open:

Right sides together, stitch the back facing strip to the inner bib, leaving the left side open for Version #1 (this is for the zipper opening). Then, press up the bottom of both the inner bib and back facing, at 5/8" (step 10d):


Set aside the inner bib and facing assembly - it's time for straps!
Below, I will show both the tube method and the folded method for making straps. The tube method works well on light, flowy fabrics and knits. The folded method works better for thicker fabrics, and worked better for the linen.
For the tube method, first stitch the narrow end of the shoulder strap to the tie end, by a 3/8" seam (step 10a). Press this seam open. Repeat for the second strap and tie.

Fold the loose short end of the tie down at 3/8" and press> Then, fold the long raw edge of the strap/tie assembly right sides together. It may be tempting to press this piece to keep those raw edges together, but I don't recommend it. Stitch at 3/8" along these long edges (step 10c), making sure to get a very firm backstitch at both the start and finish of the seam:

Now, here is the fun part! We get to turn our tubes right side out. This can take a bit of patience. I have found the best tube-turner to be a simple bobby pin.
To use the bobby pin, cut a very thin slit into the finger-pressed edge of the tube, and slide the bobby pin inside so that only about a 1/4" of the bobby pin is visible. Then gently begin to pull the tube into itself. Take your time. It isn't a race! And go gentle. One of the worst nosies is to hear a *pop!* while you're tube turning!


Here is the end of my tube emerging from the other end of the strap!

Once you get done turning the tube inside out, repeat for the other strap. You will probably have something a bit rumply looking:


But that's okay! Simply press - carefully and using a press cloth - and allow the strap to dry:

So that is the tube method. Below, I'll show you the folded method, suitable for thicker fabrics.

Sew the tie and strap together (step 11a). Press this seam open. Then, press the long edges of the strap together, folding wrong sides together.


Open the tie/strap assembly. Now, fold the raw edges in to meet one another right in the pressed groove, wrong sides together (step 11c):

Finally, fold the two outer folds together, hiding the raw edges. Press again:


Here are the different strap styles: the folded and topstitched method is at left, and the tube method (which I did not topstitch) is at right. The folded method yields a crisper result, while the tube method has a softer look.


Stitch the straps to the outer bib along the shoulder edge, and between notches (step 12 ).
Next, we are going to attach the facing assembly to the body of the overalls.
With the right sides of the facing assembly facing the right sides of the overall, pin the entire shoulder and curved edges, all the way along the back facing (diagram of 13c). If you are making Version #1, you will pin right to the raw edge. Stitch slowly, making sure not to accidentally catch one of those long straps. After making sure you've stitched securely without any puckers, go ahead and grade the seams and clip the corners and curves.


For Version #1, you have one more important seam on the facing: the side zipper. Go ahead and, with right sides still facing one another, stitch from the top of the zipper closure down to the folded edge of the facing/front (step 13c. continued at the bottom of the page). Go slowly, and then turn right-side out and make sure you can still pull the zipper all the way up.


For both views, we are now going to turn the facings right side out and pin the facing such that when we stitch from the right side, we will catch that folded edge (step 13f.). If you are a beginner or are at all unsure about this procedure, go ahead and pin, then thread-baste and remove the pins, before stitching. Don't worry too much if this feels a little scary or isn't perfect; it's a bit of a finesse.


Shown here, the right side of my front waistband before I started this seam:


And here, the inside of the facing, with the pins from the front showing through:

Below: the inside of my overalls after I'd stitched down the waistband. You can see the topstitching caught the folded facing and front seam:


Finally, topstitch along the top of the bib and facing (step 13g.). This not only delivers a cute look, it helps anchor the straps and keep the inner bib in place. If you are not topstitching, simply press well.


Time to make belt loops! These are oddly satisfying.
The directions indicate to use the same method as employed by your straps (tube or folded method). This should work just fine either way, as the strip is wider than the tie strip we used before. However, I elected to serge-finish one long edge and fold the strip in thirds, before double-topstitching the strip. This results in slightly wide, chunky looking belt carriers.


Once you have your belt carriers made (steps 14a through 14b), go ahead and cut the strip into 2 3/4" long pieces. Fold down the edges to the backside at 3/8", and press. I press these firmly with a press cloth and use a clapper to get them very, very crisp:


Now, pin them as per positional direcrtions on step 14d:


Finally, topstitch the carriers in place. I used the same back-and-forth straight stitch with heavy black thread, that I'd used for pocket reinforcement:


The inner facing:

One last step!
We get to hem our overalls! If you like, try them on to double check your length. Then fold up (3/8" then 1"), pin, and topstitch:

All finished!


Great job. If you've made it through, you have created an impressive and sophisticated garment. Put them on and stride about town like a boss!

***

About me: my name is Kelly Hogaboom and I am a clothier here in lovely Aberdeen, Washington. I sew as a business and for fun - you can't drag me out of my studio easily! You can find me on Facebook and Instagram - as well as my new Twitch stream!